Monday, 1 January 2018

How To Root LG Stylus 2 Plus Android Smartphone

Prerequisites
  1. Before getting started with the procedure, make sure that you take a complete backup of personal data on your device using appropriate apps. If something goes wrong during the rooting process, you can use this backup to restore your personal information.
  2. Ensure that your device has at least 50-60% battery backup in it before getting started with the rooting process.
  3. Now enable USB Debugging or Android Debugging on your device by following this path: Settings-> Developer Options. If you can’t access “Developer Options“, enable it by following this path: Settings -> About Phone -> Build Number (tap on it for 5-7 times to enable Developer Options).

  1. Download LG Stylus 2 Plus USB driver and install it on your computer. Only by installing USB driver, you will be able to connect your device with PC or Laptop computer successfully.
  2. Make sure that you deactivate antivirus programs in your computer as they tend to consider the rooting exploits of SRS Root (our rooting software) as Trojan/Malware.
  3. Once you finish all these prerequisites, you can move forward to the rooting procedure given below.
How To Root LG Stylus 2 Plus Android Smartphone
1.To get started, download SRS Root and extract the zip package to your computer. Once done, click “SRSRoot-Setup.exe” to launch its installation wizard.
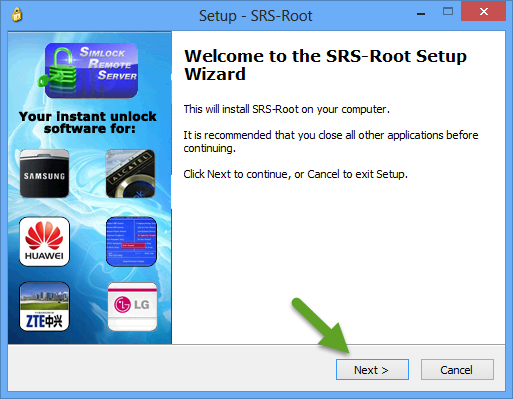
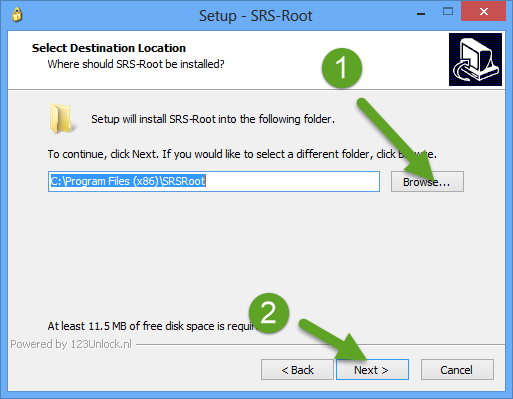
2.Now choose the “Destination Location” for installing the software and click “Next“.
3.Next, choose “Start Menu Folder” name and click on “Install” to install the program on your computer.

4) Once installed, click on “SRSRoot for Android” to launch its Window.

5) Now connect your smartphone to your computer using the original USB data cable. Once done, click on “Root Device (All Methods)” to launch the rooting process. If it doesn’t work, click on “Root Device (SmartRoot)” to root your device.
6) It will take a minute or two for SRSRoot tool to root your device, and once it does, you will get a “Success” message.
Now you have successfully finished rooting your LG Stylus 2 Plus Android smartphone. 

Tuesday, 26 December 2017

How To Unlock Bootloader On Nokia 6

How To Unlock Bootloader On Nokia 6
  1. First Download Nougat OTA zip for Nokia 6 from above and save it to your device.
  2. Now Turn Off your phone and boot Nokia 6 into recovery mode. To enter into Recovery mode of Nokia 6 either type adb reboot recovery command or follow below 
  3. Turn Off your phone completely
  4. Press and hold the Volume Up + Power button until “Powered by Android” appear.
  5. Hold the button around 5 seconds and then release both buttons.
  6. Now in Recovery select option apply update from sdcard.
  7. Now select the OTA zip file you downloaded from above.
  8. Now, wait until the process finishes.
How to Install The ROM File

  • Enable USB debugging option from setting>developer option>. To enable Developer Options, go to About phone and tap the Build Number 7 times.
  • Download ADB and fastboot driver  and install it on your PC.
  • Download the 00CN_3_170 OTA zip from above Copy ROM to a folder where adb installed.
  • Now Turn Off your phone and boot into recovery mode.
  • Choose Apply update from ADB
  • Now Connect your phone to Laptop/PC
  • On Marshmallow ROM folder press shift+right click and click on open command here.
  • Now check your connection by typing the below command.
  • adb devices
  • If your device is listed, you’re ready to flash the ROM
  • Flash the Nougat OTA Zip on Nokia 6 by typing below command
  • adb sideload File Name.zip
  • Now wait until the process complete and then Reboot the phone.

Monday, 25 December 2017

iPhone Screen Recorder App Free No Jailbreak Need

iPhone Screen Recorder App Free No Jailbreak Need
Recording iPhone screen on Mac has turned into an old story which not very many might want to purchase. In spite of the fact that you can record iPhone screen with the assistance of escape changes, you should escape your gadget. Is there any way you can skip both these strategies and record your iPhone and the iPad screen instantly? iPhone Screen Recorder App Free No Jailbreak Need.

Here, you can Download iPhone Screen Recorder App Free. I have needed for a simple answer for the record my iPhone screen for quite a while. However, sadly, my long wish hadn’t yet been satisfied until the point that I ran over Shou application the iPhone and iPad screen recorder.
Shou is an amazing iPhone screen recorder application. It is equipped for recording your iPhone’s screen without the assistance of a PC. All you need to do, to begin wi, h it is introduce it on your gadget and you are prepared to catch your iPhone’s screen rapidly.

As Shou application is not accessible in the iPhone App Store, you should download and introduce it on your gadget with another path around. This application is perfect with the two iOS 7 and 8. Here is the rundown with reference to how you can record iPhone and iPad’s screen quickly. How about we have a look.

How to Record iPhone & iPad Screen Without Jailbreak Using Shou:
Step no 1: Open http://emu4ios.net/ in Safari on iPhone or iPad.

Step no 2: Download & install Emu4ios Store (Beta) on your device. You can download apps which are not there in iOS App Store from Emu4ios Store.
Step no 3: Once you have successfully installed Emu4ios Store on your iPhone, launch this app.
Step no 4: Next up, find the Shou app and install it for free.
Step no 5: Launch Shou app. You will need to sign up for this. You can use your Facebook account to sign up instantly.
Step no 6: Tap Start Recording button to go with the process of recording the screen. iPhone Screen Recorder App Free of Cost.
This application gives you options to change Format, Orientation, Resolution and, Bitrate. To do as such, tap on the tiny “i” next to the Start Recording and pick your favored choice before going to record your iPhone’s screen.
Step no 7: Now, come out of Shou app & record your iPhone screen. The top of your device is turned red while recording.
You might need to enable Touch in order to record full-screen videos. Launch Settings app >> tap on General  >> tap on Accessibility >> scroll down and tap on Assistive Touch and toggle it on. Even when we disabled Touch on our iPad, this app allowed us to record full screen video. But, iPhone 6 did not record full screen video even when we enabled it.

If you to want to stop recording, either tap on the red banner on top of your device or go to Shou app and then tap on the recording button. iPhone Screen Recorder App Free APK.
View Recorded Videos: If you want to watch the recording, tap on Recordings from the bottom. You should see your files with the date and time. Tap on the round circle colorful icon with S written inside.
Options: When you tap on the icon to play the recording, a pop-up appears on the screen. The popup has four options:
Play: To let you play the record.
Open In: To allow you to open the recording in your favorite app.
Save To Camera Roll: To let you save the recording in the Camera Roll.
Delete: To remove the recording.
You can Watch this Video to Know about How to Record Screen of iPhone or iPad Without Jailbreaking:

Thursday, 21 December 2017

Recover Lost Data From Android Internal Memory & SD Card Easily How To

If you are feeling bored or need something to search on the internet, this gadget is always you. We rely on our smartphones every single day. If some day, you found, your all data has lost, that was in smartphones. It can be different reasons for losing data, like if your phone has smashed, or broken screen, black screen, or due to some unknown clicks.

We are here to guide you how you can recover your all lost data. You can retrieve all of your contacts, messages, history files, Audio, videos and even send and receive pictures as well.
Recover Deleted Data From Android Mobile Phone: 
To search a tool for recovering your deleted data is a difficult task when you will start the search, there would be dozens of application and tools. It would become more difficult to select one out of all. To use all of them one by one, will be time. consuming, I want to share my personal favorite tool with you. Android Data Recovery tool is my personal favorite, and very efficient in retrieving all types of deleted files out of your Android internal memory. Though Android phones are not built in method to recover internal data, somehow, the process of saving data of Android is same like Computers.

How To
Step1: Download and install:
You can download the Android data recovery utility from here, install it on your
computer or laptop and connect your computer to your Mobile phone, on which you
want to recover your lost files.
Before doing this please enable USB debugging in your Smartphone, otherwise,
your computer will not recognize your device.

Step 2: Scan Android phone:
When you will connect your phone to that data recovery software, it will
automatically detect your phone. Click on Ok when it asks the Allow USB
debugging, and click on start button to start the scanning, it will take some time to
scan of your phone, be patient, and also take care of your battery, if the battery is
not more than 20%, connect it to the charger.

Step 3: Select Type of data:
Now, it will ask you, which type of data you want to recover, for example, there are
forms of data, Audios, videos, call history, contacts, gallery, like that. You can
select any one type if you want to fetch it quickly, and if you want to recover all type
of data then click on next button.

Step 4: Select files:
Now, it will give you all of your deleted data, but still, you can select the data which
you want to recover, for example, there are thousands of images, you can select
one by one and all to retrieve. Same with videos and Audio files select them one by
one or select the all given. When you click on the recover, it will start recovering of
your data, though if your files are heavy, it can take hours to recover. But, it will


work to retrieve all of your deleted data.

How to Root Android Oreo 8.0 [OPR6]

Android Oreo was officially launched a few hours back and the factory image for the latest update is already available for the Google Pixel and Nexus devices. You can download and install them by following this guide

Using the latest SuperSu and the Magisk Module flashable filles, you can root your Nexus or Pixel device running the latest official stable version of Android 8.0 Oreo. However, you need to have an unlocked bootloader and a custom recovery installed on your device, in order to root it. You can follow the above guide to unlock the bootloader and install a Custom TWRP recovery on your Google Pixel, Google Pixel XL, Nexus 5X and Nexus 6P devices.

How to root Android Oreo 8.0 [OPR6] (SuperSU Method)

  1. First, download the latest SuperSU file from the above link.
  2. Now transfer the downloaded file to the internal storage of your device.
  3. Now folllow the guide to flash SuperSu via TWRP recovery and root your device >
  4. Download and transfer the SuperSU to your device internal memory. (download section)
  5. Now Boot your device into TWRP recovery.Guide  How To to Boot Into Recovery Mode On Android (Various Ways)
  6. Then Just Select Install and flash the SuperSUfile that you transferred in the Previous step
  7. Once flashing is done. Reboot your device.
  8. Done!!! Your Android device is now rooted
  9. For confirmation, install Root Checker from Google Play Store and confirm the root privileges in your smartphone.
How to root Android Oreo 8.0 [OPR6] (Magisk Module Method)
  1. First, download the latest Magisk Module Zip file and the Magisk installer APK file from the above links.
  2. Now transfer the downloaded files to the internal storage of your device.
  3. Now you have to boot into the TWRP recovery mode. To do that, switch off your phone and then hold the power and volume down buttons together for a few seconds until you boot into the TWRP mode.
  4. Once you are in TWRP, select install from the main screen.
  5. Now, browse for the downloaded Magisk file and then select it.
  6. Swipe to install the file.
  7. Once the installation is completed, wipe the Dalvik and Cache and then reboot your phone.
  8. Your device running Android 8.0 will now be rooted. Now, install the Magisk APK file you previously downloaded and open it to check for root.

Monday, 18 December 2017

How To Flash TWRP On Letv Le S3 X626 [Custom Recovery]

To flash TWRP custom recovery on your Letv  Le S3 X626 smartphone phone, download the recovery IMG File from the link provided below and follow the instructions.
Before you flash this custom recovery on your smartphone, note that this recovery has been tested and confirmed to be working perfectly fine without bugs.

You are entirely responsible for whatever happens to your device from your use of this custom recovery file on your smartphone.

Flashing Letv Le S3 X626 TWRP

  • Download ADB / Fastboot files and install on your PC (skip if you’ve already done this)
  • Unpack downloaded twrp archive (x626_twrp.7z). You should now have x626_twrp.img
  • Rename to twrp.img (to make flashing easy)
  • From the folder where you extracted the twrp, launch command prompt / terminal. (Windows: hold shift button, then right-click and select open command window here)
  • Connect your device to PC now via USB cable and reboot to fastboot mode by typing adb reboot-bootloader, then hit enter button. You can also boot fastboot by shutting down the device, then hold volume down + Power button.
  • Once in fastboot mode, use this command to flash TWRP: fastboot flash recovery twrp.img.
  • The command should now execute and complete in seconds.
  • Disconnect from pc and hold power button until late the phone shuts down.
  • That’s all.
  • You can boot twrp on your smartphone by holding Power + Volume Up button.
Our New Website Link Here 

    How To Flash TWRP On Letv Le S3 X626

    To flash TWRP custom recovery on your Letv Le S3 X626 smartphone phone, download the recovery IMG File from the link provided below and follow the instructions.
    Before you flash this custom recovery on your smartphone, note that this recovery has been tested and confirmed to be working perfectly fine without bugs.

    You are entirely responsible for whatever happens to your device from your use of this custom recovery file on your smartphone.

    Flashing Letv Le S3 X626 TWRP

    • Download ADB / Fastboot files and install on your PC (skip if you’ve already done this)
    • Unpack downloaded twrp archive (x626_twrp.7z). You should now have x626_twrp.img
    • Rename to twrp.img (to make flashing easy)
    • From the folder where you extracted the twrp, launch command prompt / terminal. (Windows: hold shift button, then right-click and select open command window here)
    • Connect your device to PC now via USB cable and reboot to fastboot mode by typing adb reboot-bootloader, then hit enter button. You can also boot fastboot by shutting down the device, then hold volume down + Power button.
    • Once in fastboot mode, use this command to flash TWRP: fastboot flash recovery twrp.img.
    • The command should now execute and complete in seconds.
    • Disconnect from pc and hold power button until late the phone shuts down.
    • That’s all.
    • You can boot twrp on your smartphone by holding Power + Volume Up button.
    Our New Website Link Here